Adding a Location to the Asset Detail Information
To add a new location to the Asset Detail Information, follow these steps:
1. Enter the campus, quantity and location information that is common to all the assets being added.
2. Click
 to add the location.
The system opens an Asset Location-Asset Unique Information(xxxxxx) section (where 'xxxxxx' is the system-assigned asset number) within the tab. This section allows you to add more asset detail information for each of the assets designated for this location.
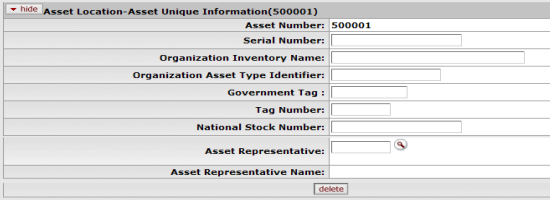
Asset Location Asset Unique Information section definition
|
Description | |
|
Asset Number |
Display-only. The system-assigned identifier unique to the asset. |
|
Serial Number |
Optional. Enter the unique identification number assigned to the asset by the manufacturer. |
|
|
Optional. Enter a common name for inventory purposes.
This name is used to sort assets within an organization in order to assist
with physical inventories. This name is In addition to the equipment
description that CAM pulls from the associated purchase order. |
|
Organization Asset Type Identifier |
Optional. Enter the type used by the organization to classify the equipment. |
|
Government Tag |
Optional; for assets purchased with federal and/or state funds. Enter the number assigned by a governmental entity to the asset. |
|
Tag Number |
Optional. Enter the unique identification number issued by the University and affixed to the asset. |
|
National Stock Number |
Optional. Enter the federal identification number assigned to the asset. |
|
Asset Representative |
Optional. Enter a user
ID in order to group and sort assets by this user's name on
reports. If desired, search for this user ID from the Person lookup
|
|
Asset Representative Name |
Optional. Enter the actual name of the user
represented by the asset representative user ID. If desired, search for
the name from the Person lookup
|
 .
. Add Payments Tab